
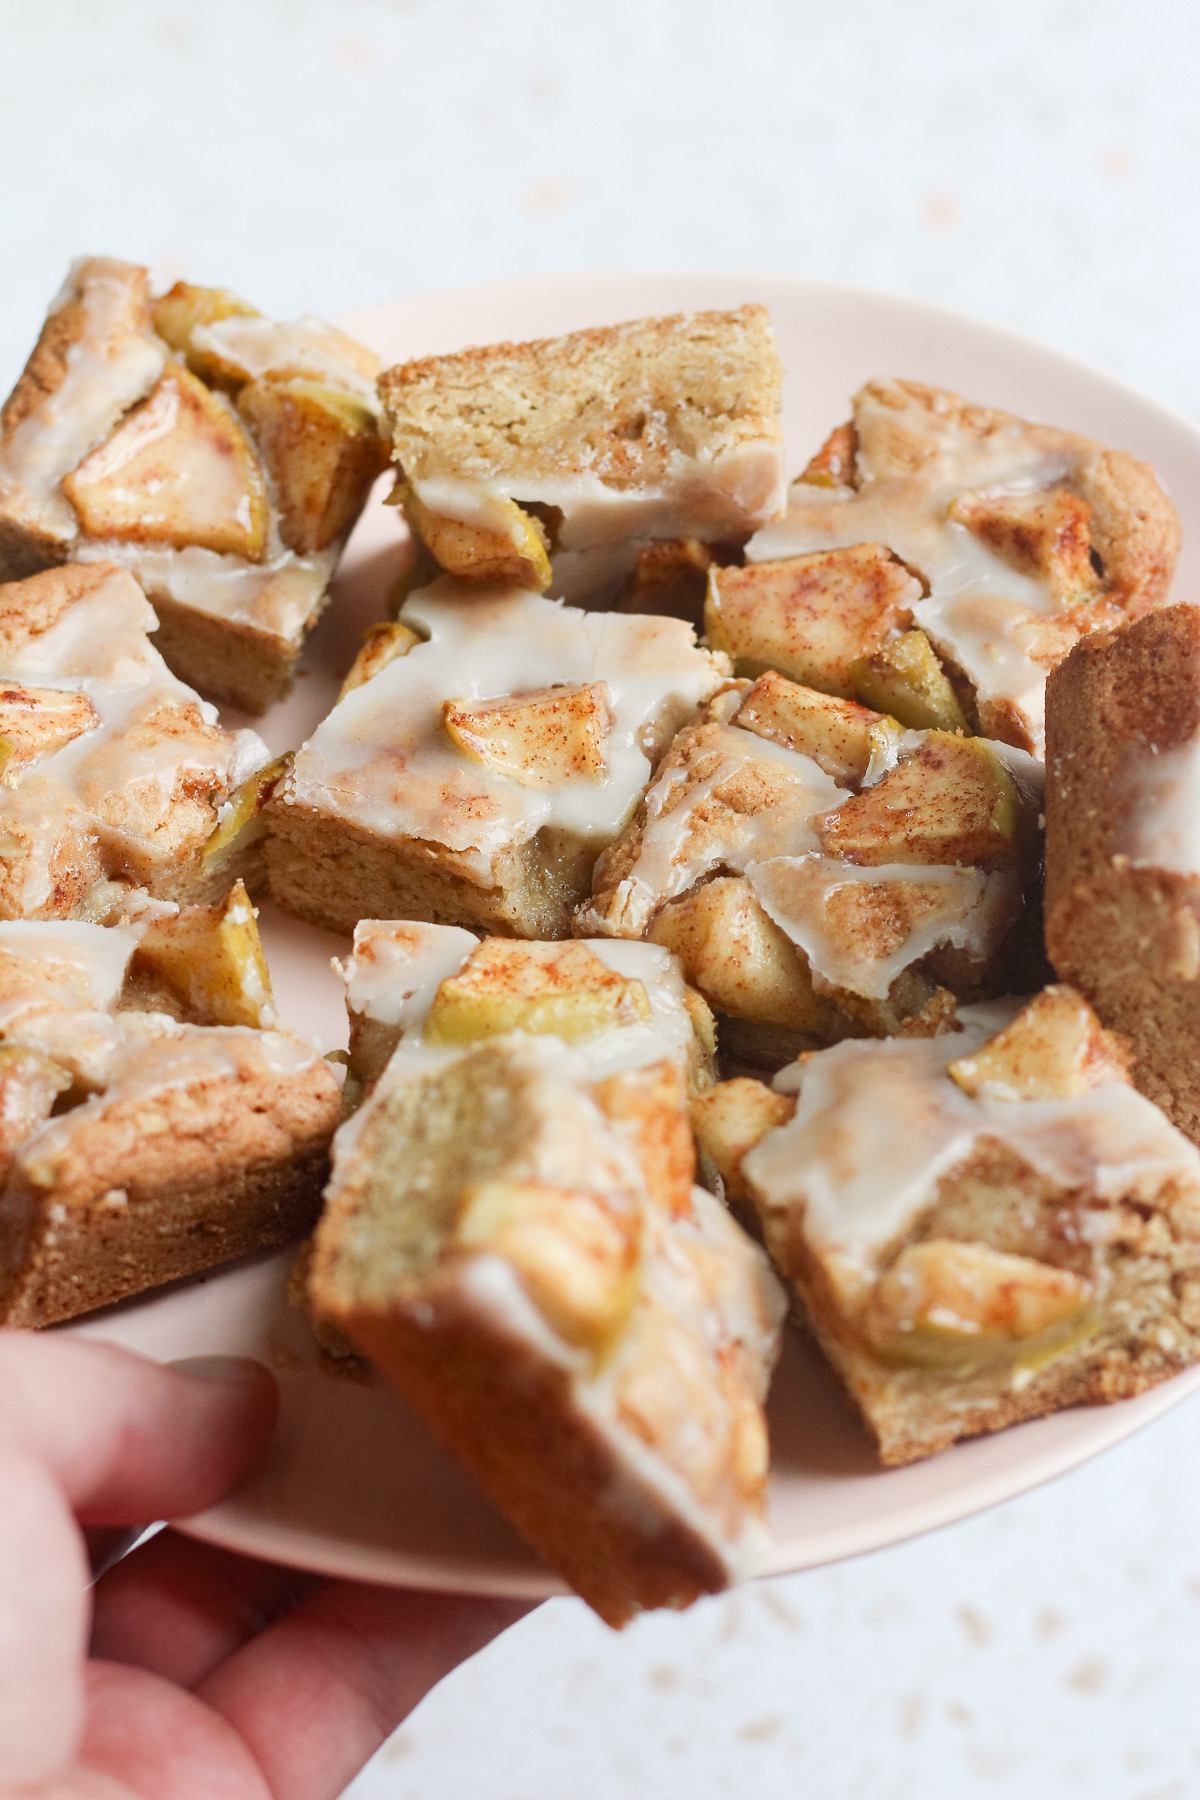
These Apple Fritter Bars are everything you love about the classic apple fritter—but without the hassle of deep frying. I’ve never loved frying at home (too messy, with hot oil), so I set out to create an easy, one-pan version that bakes right in the oven. I’m so happy with how they turned out! These bars are incredibly simple to make and have the best fall flavor. They’re packed with fresh apples, held together by a rich, brown butter oatmeal base, and finished with a sweet maple glaze that ties it all together. While they’re perfect any time of year, they truly shine during the fall baking season.
Ingredients
- 8 tablespoons unsalted butter
- 3/4 cup + 1 tablespoon light brown sugar
- 2 tablespoons granulated sugar
- 1 large egg
- 1 teaspoon vanilla extract
- 1 cup + 2 tablespoons all-purpose flour
- 3/4 cup old fashioned oats
- 1/2 teaspoon salt
- 1/2 teaspoon baking soda
- 1/4 teaspoon ground cinnamon
- 1 Granny Smith apple
- 1/2 cup powdered sugar
- 1/2 tablespoon maple syrup
- 1 tablespoon milk
Step by step instructions
Note: Find the full ingredient measurements and instructions in the recipe card at the bottom of this page.
- Prep the apples. Dice the apple into 1/2 inch pieces and place in a medium bowl. Add the ground cinnamon and 1 tablespoon light brown sugar and toss to combine.
- Brown the butter and oats. In a large nonstick skillet over medium high heat, add the cubed butter. Once it starts to melt and sizzle, add the oats. Continue stirring until the butter has browned and you see the yummy toasty bits. Don’t stop stirring or it may burn. Remove the butter oat mixture and place in a large glass bowl to cool for about 10 minutes.
- Add the sugars. Add 3/4 cup light brown sugar and granulated sugar and mix until combined.
- Add the egg and vanilla. Add the egg and vanilla extract, and mix until well combined.
- Add the dry ingredients. Add the flour, baking soda, and salt and mix just until combined.
- Prep the oven and pan. Preheat your oven to 350°F. Line an 8×8-inch baking pan with parchment paper. Add the crust mixture to the pan. Use an offset spatula to press it evenly into the pan.
- Assemble the bars. Pour the apples over the crust and spread evenly. Gently press the apples into the crust a bit.
- Prepare the maple glaze. Add the maple glaze ingredients to a small bowl and stir to combine.
- Bake. Bake for 30-33 minutes, or until the top is lightly golden.
- Cool and glaze. Let cool in pan for at least 5 minutes before adding the glaze. As soon as you add the glaze, carefully pick up the pan and tilt it from side to side to help the glaze evenly cover the whole pan. Cool for at least another 30 minutes. Then cut into 16 squares. Enjoy!

Step 1: Prep the apples.

Step 2: Brown the butter and oats.

Step 3: Add the sugars.

Step 4: Add the egg and vanilla extract.

Step 5: Add the dry ingredients.

Step 6: Prep the oven and pan.

Step 7: Assemble the bars.

Step 8: Prepare the maple glaze.

Step 9: Bake.

Step 10: Cool and glaze.

Why you’ll love these apple fritter bars
- No Frying Needed – All the flavor of a traditional apple fritter, without the mess or hassle of deep frying. Just your pan and your oven!
- Easy Recipe – Easy to whip up with basic pantry ingredients—perfect for a quick dessert or weekend bake.
- Amazing Texture – These bars have the best texture. A soft bite with a good chew.
- Perfect for Fall (or anytime!) – Made with fresh apples and cinnamon, these bars are a cozy treat all year round.
- Small Batch, Big Flavor – Baked in an 8×8 pan—ideal for sharing with a friend or savoring solo if they last long!

Tips for the best apple fritter bars
- Use Fresh, Crisp Apples – Choose firm apples like Honeycrisp, Granny Smith, or Fuji for the best texture and a nice balance of sweet and tart flavor.
- Dice Apples Evenly – Small, uniform pieces ensure the apples bake evenly.
- Don’t Overmix the Batter – Mix just until combined to keep the bars soft and tender. Overmixing can lead to a tougher texture.
- Line Your Pan with Parchment – This makes it easy to lift the bars out cleanly and helps prevent sticking.
- Let Them Cool Slightly Before Glazing – Allow the bars to cool 5 minutes before adding the maple glaze so it sets nicely without melting off completely.
Frequently asked questions
Crisp, slightly tart apples like Granny Smith, Honeycrisp, or Fuji work best. They hold their shape during baking and add great flavor contrast to the sweet batter.
It’s up to you! Peeled apples give a softer bite and more traditional fritter texture, but unpeeled apples add a little more texture and fiber.
Absolutely. Let them cool completely, then wrap them tightly and freeze for up to 2 months. Thaw at room temperature and drizzle with fresh glaze if needed.
The base recipe is not, but you can substitute a 1:1 gluten-free baking flour and plant-based butter and milk alternatives for a GF/vegan-friendly version. Just note that texture may vary slightly.
An 8×8-inch square pan is perfect for a small batch. For thinner bars, you can use a 9×9-inch pan, but adjust the baking time down by 4-6 minutes.
Definitely! The bars are delicious on their own, but the glaze adds that classic fritter finish. You could also sprinkle with powdered sugar, cinnamon-sugar, or even caramel instead.

Did you make this?
Please rate the recipe and leave a comment below. This helps other readers decide if this is a great recipe to bake. Be sure to tag me on Instagram using @schmidtybakes so I can see. I love to see what you’re baking!
Apple Fritter Bars

Ingredients
For the apples
- 1/4 teaspoon ground cinnamon
- 1 tablespoon dark brown sugar
- 1 Granny Smith apple
For the crust
- 8 tablespoons unsalted butter
- 3/4 cup dark brown sugar
- 2 tablespoons granulated sugar
- 1 large egg (room temperature)
- 1 teaspoon vanilla extract
- 1 cup + 2 tablespoons all-purpose flour
- 3/4 cup old fashioned oats
- 1/2 teaspoon baking soda
- 1/2 teaspoon salt
For the maple glaze
- 1/2 cup powdered sugar
- 1/2 tablespoon maple syrup
- 1 tablespoon milk
Instructions
For the apples
- Dice the apple into 1/2 inch pieces and place in a medium bowl. Add the ground cinnamon and dark brown sugar and toss to combine.
For the crust
- In a large nonstick skillet over medium high heat, add the cubed butter. Once it starts to melt and sizzle, add the oats. Continue stirring until the butter has browned and you see the yummy toasty bits. Don’t stop stirring or it may burn. Remove the butter oat mixture and place in a large glass bowl to cool for about 10 minutes.
- Add 3/4 cup light brown sugar and granulated sugar and mix until combined.
- Add the egg and vanilla extract, and beat until well combined.
- Add the flour, baking soda, and salt and mix just until combined.
- Preheat your oven to 350°F. Line an 8×8-inch baking pan with parchment paper. Add the crust mixture to the pan. Use an offset spatula to press it evenly into the pan.
- Pour the apples over the crust and spread evenly. Gently press the apples into the crust a bit.
- Bake for 30-33 minutes, or until the top is lightly golden.
- Let cool in pan for at least 5 minutes before adding the glaze. As soon as you add the glaze, carefully pick up the pan and tilt it from side to side to help the glaze evenly cover the whole pan. Cool for at least another 30 minutes. Then cut into 16 squares. Enjoy!
For the maple glaze
- Add the maple glaze ingredients to a small bowl and stir to combine.
The nutrition facts provided are calculated using a third-party tool and are estimates only. Actual nutritional content may vary based on the ingredients and brands you use, as well as portion sizes. For accurate results, please consult a registered dietitian or nutritionist.


These are so good. The combo of ingredients and textures made these a hit in my house!